Skip to content
Tutorial: Create Gold Jewelry with Photoshop, Part Two

Tutorial: Create Gold Jewelry with Photoshop, Part Two

Originally Published August 2010

In part one of this tutorial (available here), we used a variety of Photoshop’s Layer Styles to turn a black and white drawing into a convincing full-color piece of gold jewelry. The Layer Styles used created a three-dimensional look, with a little bit of Drop Shadow and Inner Shadow.

ic:In part two, we'll create the jewel and its setting, to complete the piece.

The gold color comes from a Layer Style called Gradient Overlay. The gold texturing is achieved with Bevel and Emboss, along with a Texture. Here’s where we left off, at the end of Part One.

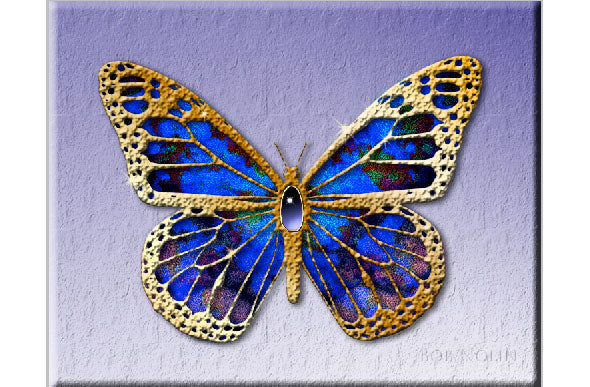
Notice the empty oval area in the middle of the butterfly. That’s where we’ll add a jewel. We’ll use the shape of that oval to create the jewel, first by creating a “setting” for it, and then the gemstone itself. Take a look at the Line Art layer, below. We’ve added four Layer Styles to this layer, but the actual line art itself is unchanged. It’s still black and white.

ic:The Line Art layer and its four Layer Effects.
Let’s zoom in on the oval area of the line art. To see it without the Layer Styles, right click on the Layer Styles section of the Line Art layer. A pop-up menu appears. Select “Disable Layer Styles”. The line art we started with is once again visible. The Wing Coloring layer is still visible, so now we have a kind of stained glass look, which is pretty cool. Make sure the Line Art layer is active, and then click once inside the oval with the Magic Wand tool.
ic:A close-up of the line art, with the Layer Styles turned off.
What we have now is an oval selection. This can be stroked (a term that goes back to pen and ink days), which will form the basis of our setting. First, we’ll need a new, empty layer. Then, from the Edit menu, select Stroke… Set the width to 13 pixels, and the color to solid black. Click Ok, and now we have a black oval on the new layer. It will seem to blend into the existing line art, so click on the eye on the Line Art layer to turn it off temporarily. Now you see the black oval. Deselect the oval with CMD+D or CTL+D. We’re ready to give this oval the gold treatment.
With the new gold setting layer active, we’ll use the “FX” icon again at the bottom of the layers palette, with a difference.
ic:The gold setting created by applying a Gradient Overlay to the black oval.

This time, we’ll click on the little triangle next to “FX” to get the drop-down menu of Layer Styles. Choose Gradient Overlay. This saves you a click, compared to clicking “FX” once and then selecting Gradient Overlay when the dialog comes up. In the middle area, choose the nice gold gradient we created in Part One from the drop down. Change the angle to 51 degrees or so. This makes the gold “reflections” look a bit more realistic, I think. Now we’ll use the Bevel and Emboss Layer Style to give the setting a little three-dimensionality. You’ll use the Bevel and Emboss Layer Style, and the Contour Layer Style, under the Bevel and Emboss style. Contour is dependent upon Bevel and Emboss, so do Bevel and Emboss first. (See screenshots.) Remember: to get to each of these dialogs, click on the word itself in the left-side column. The result will look like a rounded band of gold, more or less.

ic:Bevel and Emboss and (inset) Contour Layer Styles for the gold setting.

The setting is done, so now let’s create the jewel that goes inside it. Once again, we’ll use the Magic Wand tool to select the inside (white) area of the oval. Make sure the Gold Setting layer is active, NOT the Line Art layer, or your oval selection will be too big. Insert a new empty layer above the Gold Setting layer. (We’ve created a selection using the contents of one layer to use on another layer. Selections “apply” to whichever layer is currently active.) With the Gradient tool (which is nested with the Paint Bucket), draw a dark to light gradient. (Use the Linear Gradient mode). You can use whichever color you like. There are just two stops in this gradient: near-white and a good dark, solid color, on opposite ends from each other.

ic:Since the light part of this gradient is on the left, it will begin with that color. If you want it to be dark on top, start drawing from the bottom.
Insert a new layer above the gradient layer, and call it “dark overlay.” Choose the gradient called “Black to transparent.” Instead of Linear Gradient, use the one next to it, Radial Gradient. Draw from just below center to just beyond the top edge of the selection. If it’s dark in the middle, check the Reverse checkbox in the Property bar, and try that. It should be dark on the outside, and white in the middle. Here’s what it looks like with the color layer turned off.
Change the blending mode for the Overlay Dark layer to Overlay. Now it should look good and round, with a deep coloring, like this:
To finish the jewel, insert one more layer, choose a soft white brush, at high opacity, and add a highlight. You can add a star shape, too, on top of that, for extra pizazz. And that’s it! If you’ve followed this tutorial all the way through both parts, congratulations! If you got stuck, or something wasn’t clear, please leave a comment, and we’ll get it straightened out pronto.


Older Post
Newer Post

Leave a comment

Back to top

Shopping Cart

Your cart is currently empty

Shop now