
Tutorial: Painting Curly Hair in Corel Painter
Originally Published February 2009
When it comes to painting portraits, faces are definitely the hardest part. But running a close second has got to be hair. It’s so complicated! There’s so much detail! Today we’re going to tackle curly hair, the most difficult kind of hair there is. We’ll break it down, step by step, and by the end, I hope, you’ll have lost your fear of the Big Hairy Monster.

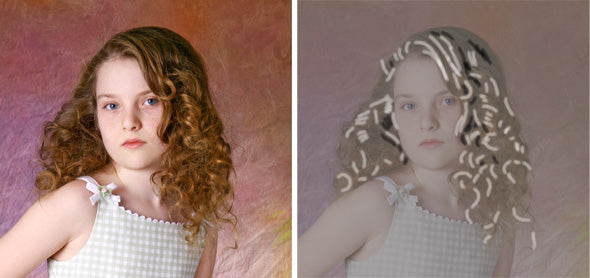
One of the tricks I learned in art school is squinting. Squint your eyes at the original (above, left), and you’ll see the detail drop away somewhat. The highlights and darks will stand out when you squint. I’ve tried to do something similar by overlaying the image with a middle grey tone (above, right). The light and dark squiggles represent the first stage in painting the hair. The idea is to simplify the hair into just three values: dark, light, and middle grey. Place all these values in by painting right over what’s there, and then, in the second step, blend these areas into each other. Let’s take it a step at a time.
Step One: Place the highlights
Use a Captured Bristle variant (in the Acrylics category). Make sure you are not cloning color (the “rubber stamp” is toggled off). Use an Opacity of about 60%, Resat around 30. Clone your original image (File > Clone). Hold down the alt key to access the eye dropper, and select a color from the brightest area of highlight in the hair. Now, in the color wheel, nudge this color a tad towards white. You will paint over all the highlights you can see, and pull out areas that are not quite highlights, using this one color. Don’t worry about being accurate or neat, just paint quick strokes with your stylus. Here’s what it looks like at the end of Step One:

Step Two
Now use the eye dropper to select a dark area of the hair. You can move it towards the blue side of the color wheel if you like. With this dark, paint in the dark masses. There aren’t a lot in this image. Another trick from art school: place darks against lights. This is what makes the highlights sparkle and shine. Again, don’t labor over this step. Work quickly, and do less than more.

Step Three
With the eye dropper, pick a middle value. Look at the color swatches in the image above to see the values I used. The middle value should be what is known as “local color”. It should be the color of the hair in a midtone range. Use this color to overlay a good amount of the detailed area lying between the lights and darks you’ve painted. There’s no hard and fast rule for this part, and you could skip it altogether and just begin blending at this point. But I do this to help me define the masses of hair, to make them into shapes. As you can see, this poor girl’s hair was not cooperating for her photo session! So I painted it into shape, so to speak. Don’t spend too long here. Most of the work takes place in Step Four.
Step Four
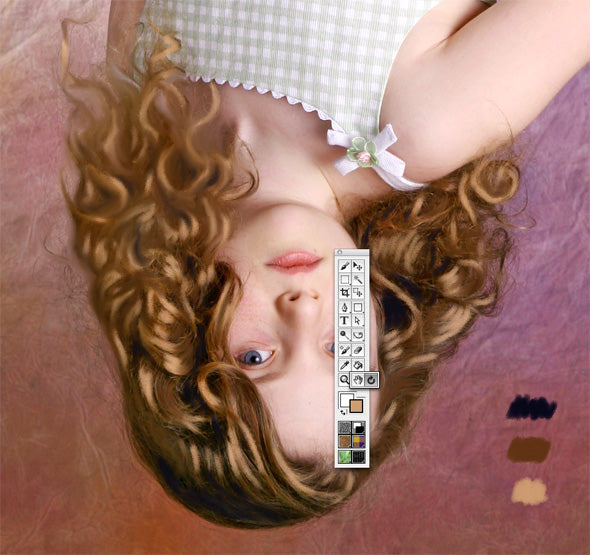
Painter allows to rotate your canvas (something Photoshop doesn’t do). This can be really helpful when you find your strokes running at an odd–even somewhat painful–angle. With a traditional painting, you’d simply turn the canvas. You can do the same with Painter. In the image above, notice that I’ve clicked on the “hand” tool in the toolbox. It shares a space with the turning tool, which looks like an arrow doing a u-turn. Click once on the curving arrow, and now click on the canvas and move the mouse while holding down the button. To move the canvas back to the original position, just double-click on the canvas (click on the curved arrow first). For complicated areas like the hair, or a grove of trees, it can be helpful if you are a bit disoriented. It’s yet another trick, I guess. You won’t be quite so critical of your work if you’re just painting a bunch of shapes. Try it and see if it works for you. Anyway, the painting method for Step Four is this: lower the Resat value of your Captured Bristle all the way down to zero. Now it’s a blender brush. Paint over the three tonal areas, and blend them together slightly where their edges meet. In the image above, I’ve only painted the area on our left. The rest is still at Step Three. Just keep going, don’t listen to that voice in your head that says “This is a mess!” When you have done the entire hair, turn it right-side up. I think you’ll be pleasantly surprised. Good luck!

